
QToolButton with a drop-down menu that displays the last action
customtbutton/customtoolbutton.cpp
customtbutton/customtoolbutton.qrc
customtbutton/icons/alignLeft.png
customtbutton/icons/alignCenter.png
customtbutton/icons/alignRight.png
customtbutton/main.cpp
customtbutton/mainwindow.h
customtbutton/mainwindow.cpp
customtbutton/customtoolbutton.pro (Qt 5)
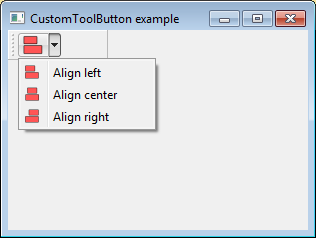
This article shows an implementation of a custom QToolButton with a popup menu that always displays the most recently executed action. The original implementation of the QToolButton allows a popup menu with icons, however, it does not have the capability to display the most recently executed action. This means that after we close the menu, it will always display the default action, rather than the last action.
The QToolButton is illustrated in the figure below. In the original implementation of the QToolButton, the toolbar will always display the 'Align left' action, regardless of the most recently executed action. In the new implementation, the toolbar will display the most recently executed action.
Implementation details
Below, you can see the header and source file of the new CustomToolButton class that reflects our requirements. In the constructor, we set the popup mode of the tool button. I prefer the QToolButton::MenuButtonPopup, as it displays an arrow next to the button - a clear sign that the button contains some extra functionality. Next, we connect the existing signal triggered(QAction*) to the existing slot setDefaultAction(QAction*). This is all we need to do. The fact, that by triggering the action, we simultaneously make it default, allows us to see the last executed action anytime we close the menu.
#ifndef CUSTOMTOOLBUTTON_H
#define CUSTOMTOOLBUTTON_H

#include <QToolButton>
#include <QDebug>

class CustomToolButton : public QToolButton
{
    Q_OBJECT
public:
    explicit CustomToolButton(QWidget *parent = 0);
};

#endif // CUSTOMTOOLBUTTON_H
#include "customtoolbutton.h"

CustomToolButton::CustomToolButton(QWidget *parent) :
    QToolButton(parent)
{
    setPopupMode(QToolButton::MenuButtonPopup);
    QObject::connect(this, SIGNAL(triggered(QAction*)),
                     this, SLOT(setDefaultAction(QAction*)));
}
How to use the new class CustomToolButton
The new CustomToolButton can be used in the same way as the regular QToolButton. If you look at the header file, the class MainWindow stores the pointers to all the actions and widgets that we need. It also introduces three slots (alignLeft(), alignCenter(), alignRight()) for the align actions that we introduced. Other than that, the header follows the structure recommended by Qt.
#ifndef MAINWINDOW_H
#define MAINWINDOW_H

#include <QMainWindow>
#include <QAction>
#include <QMenu>
#include <QToolBar>
#include <QToolButton>
#include <QDebug>
#include "customtoolbutton.h"

class MainWindow : public QMainWindow
{
    Q_OBJECT
public:
    explicit MainWindow(QWidget *parent = 0);

public slots:
    void alignLeft();
    void alignCenter();
    void alignRight();
private:
    void createActions();
    void createMenus();
    void createToolBars();
    void createToolButtons();

    QAction* alignLeftAction;
    QAction* alignCenterAction;
    QAction* alignRightAction;
    QMenu* alignMenu;
    QToolBar* editToolBar;
    CustomToolButton* alignToolButton;

};

#endif // MAINWINDOW_H
Now look at the source file:
- In createActions() we initialize the three align QActions and set their icons. Next, we connect their triggered() signals to their respective slots (alignXXX()). For the sake of simplicity, the slots only print their presumed functionality.
- We initialize the alignMenu and populate it with the above mentioned actions.
- We create a CustomToolButton object, assign the alignMenu to it and set its default action to alignLeftAction.
- Last, we create the editToolBar in which we place the alignToolButton.
#include "mainwindow.h"

MainWindow::MainWindow(QWidget* parent):QMainWindow(parent)
{
    createActions();
    createMenus();
    createToolButtons();
    createToolBars();
}

void MainWindow::createActions(){
    alignLeftAction = new QAction("Align left", this);
    alignCenterAction = new QAction("Align center", this);
    alignRightAction = new QAction("Align right", this);

    alignLeftAction->setIcon(QIcon(":/icons/alignLeft.png"));
    alignCenterAction->setIcon(QIcon(":/icons/alignCenter.png"));
    alignRightAction->setIcon(QIcon(":/icons/alignRight.png"));

    QObject::connect(alignLeftAction, SIGNAL(triggered()),
                                this, SLOT(alignLeft()));
    QObject::connect(alignCenterAction, SIGNAL(triggered()),
                                  this, SLOT(alignCenter()));
    QObject::connect(alignRightAction, SIGNAL(triggered()),
                                  this, SLOT(alignRight()));
}

void MainWindow::createMenus(){
    alignMenu = new QMenu;
    alignMenu->addAction(alignLeftAction);
    alignMenu->addAction(alignCenterAction);
    alignMenu->addAction(alignRightAction);
}

void MainWindow::createToolButtons(){
    alignToolButton = new CustomToolButton;
    alignToolButton->setMenu(alignMenu);
    alignToolButton->setDefaultAction(alignLeftAction);
}

void MainWindow::createToolBars(){
    editToolBar = new QToolBar(this);
    editToolBar->addWidget(alignToolButton);
}

void MainWindow::alignLeft(){
    qDebug() << "MainWindow::alignLeft()";
}

void MainWindow::alignCenter(){
    qDebug() << "MainWindow::alignCenter()";
}

void MainWindow::alignRight(){
    qDebug() << "MainWindow::alignRight()";
}
Now we just need to initialize the MainWindow from main.cpp and the job is done.
#include <QApplication>
#include "mainwindow.h"

int main(int argc, char *argv[])
{
    QApplication a(argc, argv);
    MainWindow w;
    w.setWindowTitle("CustomToolButton example");
    w.setMinimumSize(300,200);
    w.show();
    return a.exec();
}
Tagged: Qt