
Deployment and installation of a Qt application in Microsoft Windows
This article shows how to deploy and create an offline installation script for a Qt application for Microsoft Windows. The basis for this article is a Youtube video tutorial by Duarte Corporation (in Spanish).
Deployment without installation
This step will provide us with the necessary dynamic libraries (DLLs) that need to accompany the executable. This step needs to be performed regardless of whether we deploy the application with or without an installation script.
- Open your project in Qt Creator and compile it in the Release mode.
- Go to the release folder and delete everything except for the executable.
- In Qt Creator right click on the .pro file of your project and click on Open Command Prompt Here.
- Go to the release folder with the command cd release.
- Run the win deployment tool, this should be something similar to:
C:\Qt\5.6\mingw49_32\bin\windeployqt.exe
- The release folder should now contain most of the necessary DLLs.
- Additionally (if you are using MinGW/gcc), copy the following dlls from the location of your compiler (C:\Qt\5.6\mingw49_32\bin) into the release folder: libgcc_s_dw2-1.dll, libwinpthread-1.dll, libstdc++-6.dll.
- Try to run the executable directly from the release folder, make sure it does not complain about any missing libraries.
Installation script
This section shows how to prepare the installation script for the release folder containing all the necessary DLLs.
Installing Qt Installation Framework
- Go to the following url: https://download.qt.io/official_releases/qt-installer-framework/ and download the latest edition release of the Qt Installer Framework for MS Windows, in our case 2.0.5/QtInstallerFramework-win-x86.exe.
- Install the framework. If the installation was successful, you should find an executable binarycreator.exe in the folder C:\Qt\QtIFW2.0.5\bin.
Optional: To add help for Qt Installer Framework into Qt Creator:
- In Qt Creator go to Tools -> Options -> Help.
- Click on the tab Documentation.
- Add the following file: C:\Qt\QtIFW2.0.5\doc\ifw.qch. An item org.qt-project.ifw.205 should appear in the list. You should now be able to call help for Qt the Installer Framework via the Help option in Qt Creator.
Configuring the installer via config.xml
To prepare the basic version of the installation script we are going to use an example provided by the Qt Installation Framework called startmenu. Firstly, we are going to configure the installer.
- Go to the folder C:\Qt\QtIFW2.0.5\examples, copy the directory startmenu into one of your working folders, e.g. Desktop or Documents.
- Open your copy of the folder startmenu and go to startmenu -> config -> config.xml.
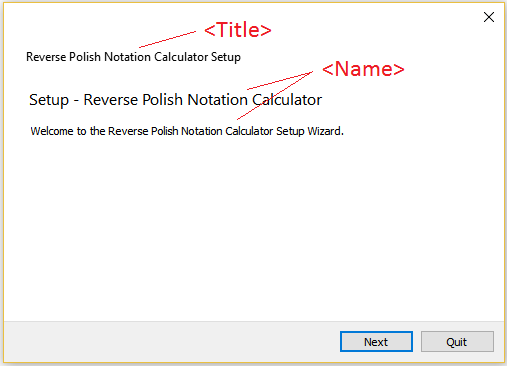
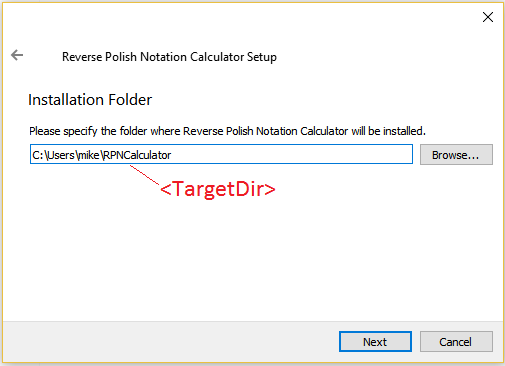
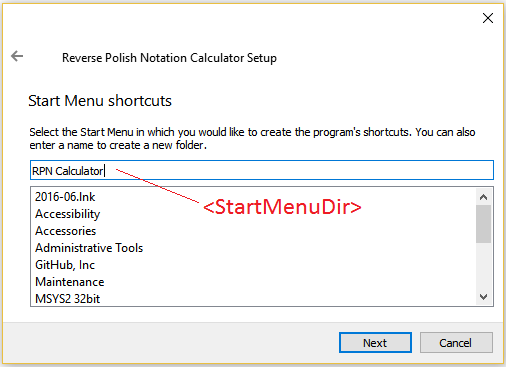
- Open config.xml in any text editor and modify the text to match your project. The images below show how our input appears in the installer.
<?xml version="1.0" encoding="UTF-8"?>
<Installer>
    <Name>Reverse Polish Notation Calculator</Name>
    <Version>1.0</Version>
    <Title>Reverse Polish Notation Calculator</Title>
    <Publisher>Walletfox.com</Publisher>
    <StartMenuDir>RPN Calculator</StartMenuDir>
    <TargetDir>@HomeDir@/RPNCalculator</TargetDir>
</Installer>
<Name> application name that is added to the page name and introduction text <Version> application version number <Title> installer name displayed on the title bar <StartMenuDir> name of the default program group for the product in the Windows Start menu <TargetDir> default target directory
Providing data and creating package information file package.xml
In the next step, we are going to modify the installer package information file (package.xml) that specifies the components that are available for installation.
- Go to the folder startmenu -> packages -> org.qtproject.ifw.example -> data.
- Delete README.txt from the data folder.
- Move all the contents from your project release folder into this data folder.
- Go to the folder startmenu -> packages -> org.qtproject.ifw.example -> meta -> package.xml.
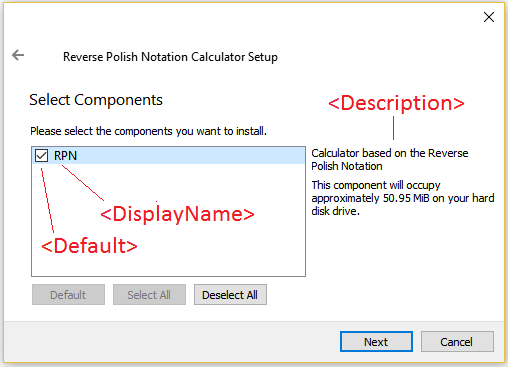
- Open package.xml in any text editor and modify the text to match your project data. In our case:
<?xml version="1.0" encoding="UTF-8"?>
<Package>
    <DisplayName>RPN</DisplayName>
    <Description>Calculator based on the Reverse Polish Notation</Description>
    <Version>1.0</Version>
    <ReleaseDate>2017-04-27</ReleaseDate>
    <Default>true</Default>
    <Script>installscript.qs</Script>
</Package>
<DisplayName> human-readable name of the component <Description> human-readable description of the component <Version> version number of the component <ReleaseDate> date when this component version was released <Default> true if it preselects the component in the installer <Script> the file name of the JavaScript file that is loaded to perform operations
Adding entries to the Start Menu via installscript.qs
- Go startmenu -> packages -> org.qtproject.ifw.example -> meta and open installscript.qs in Qt Creator.
- Modify the installscript.qs in the following manner: Change "@TargetDir@/README.txt" to @TargetDir@/ + the name of your executable (in this case, rpn_calculator.exe).
- Change "@StartMenuDir@/README.lnk" to @@StartMenuDir@/ + whatever you would like to appear in the Start Menu of MS Windows(in this case, RPN Calculator.lnk)
- Remove the keywords which handle icons, i.e. "iconPath=%SystemRoot%/system32/SHELL32.dll", "iconId=2".
function Component()
{
    // default constructor
}

Component.prototype.createOperations = function()
{
    // call default implementation to actually install README.txt!
    component.createOperations();

    if (systemInfo.productType === "windows") {
        component.addOperation("CreateShortcut", "@TargetDir@/rpn_calculator.exe", "@StartMenuDir@/RPN Calculator.lnk",
            "workingDirectory=@TargetDir@");
    }
}
Generating the installer
- In the command prompt go to the folder startmenu.
- Paste the following line into the command prompt:
C:\Qt\QtIFW2.0.5\bin\binarycreator.exe --offline-only -c config/config.xml -p packages installer.exe
Executable of the installer should now appear in the startmenu project folder. - Try to run the installer. After a successful installation, you should find the application shortcut in the start menu of Windows. You should also find the executable and DLLs in the folder where you installed the application.
- You can uninstall the application via the Control Panel of MS Windows or via maintenancetool.exe that can be found in the folder where you installed the application.
Note: If you do not see the application icon in the Start menu of MS Windows, check that the line below appears in the .pro file of your project and that the application icon is of type .ico. This problem has nothing to do with the installation script.
win32:RC_ICONS += rpn_calculator.ico
Tagged: Qt