
Snap to grid while moving QGraphicsItem
This article shows how to snap to the grid while dragging QGraphicsItem. Two variants of the problem are presented:
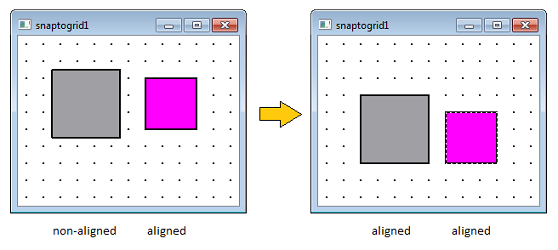
- Variant 1 aligns non-aligned items with the grid, aligned items stay aligned
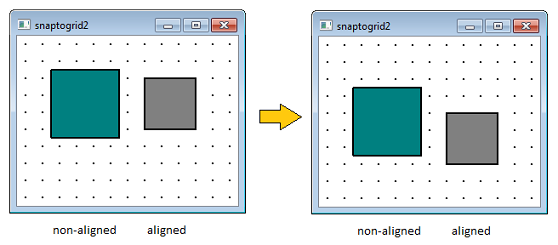
- Variant 2 translates items by a specific grid step, i.e. aligned items stay aligned, non-aligned items stay non-aligned by the same offset as before
Note: This solution should only be used if you need to move one item at the same time. If you need to move several items at the same time, you will be better off overriding QGraphicsScene::mousePressEvent(), mouseMoveEvent() and mouseReleaseEvent(). The same is true if you have different subclasses of items and you do not want to introduce an extra base class only for the sake of aligning functionality.
To obtain snap-to-grid functionality we need to do the following:
- subclass QGraphicsScene and override drawBackground()
- subclass QGraphicsItem (in this case only QGraphicsRectItem) and override itemChange()
- For Variant 2 we also need to override QGraphicsRectItem::mousePressEvent()
How to draw a grid in QGraphicsScene
To draw a grid we need to subclass QGraphicsScene and override drawBackground(QPainter*, const QRectF). This is necessary for both variants. The code can be seen below:
void Scene::drawBackground(QPainter *painter, const QRectF &rect)
{
    QPen pen;
    painter->setPen(pen);

    qreal left = int(rect.left()) - (int(rect.left()) % gridSize);
    qreal top = int(rect.top()) - (int(rect.top()) % gridSize);
    QVector<QPointF> points;
    for (qreal x = left; x < rect.right(); x += gridSize){
        for (qreal y = top; y < rect.bottom(); y += gridSize){
            points.append(QPointF(x,y));
        }
    }
    painter->drawPoints(points.data(), points.size());
}
Notice the following lines:
qreal left = int(rect.left()) - (int(rect.left()) % gridSize);
qreal top = int(rect.top()) - (int(rect.top()) % gridSize);
The reason for the introduction of the extra variables (left and top) is that we would like to align the start of the grid with zero of the coordinate system. Imagine that you have a scene that does not start at (0,0), but at (10,10). Assume that the gridSize is 20. If we started iterating from rect.left() we would have grid points with x-coordinate 10, 30, 50, etc. which are not very nice to calculate with considering the gridSize is 20. So the code above enables to get a grid with coordinates 20, 40, 60, etc.
The rest of the code computes the position of the grid points and puts them into QVector<QPointF>. In the end, we draw all the points with painter->drawPoints().
Optimization tip: In case your application uses zoom in the QGraphicsView and non-zero pen width, you should make the pen cosmetic. Cosmeticity ensures constant thickness of the pen regardless of the transformation. For large grids, QVector can be replaced by a more efficient container QVarLengthArray.
Variant 1 - How to align an item with the grid
This variant of the implementation aligns non-aligned items with the grid whenever they are dragged. In order to obtain this functionality we subclass QGraphicsRectItem and override itemChange().
class CustomRectItem : public QGraphicsRectItem
{
public:
    CustomRectItem(const QRect& rect, QGraphicsItem* parent,
                                   QGraphicsScene* scene);
protected:
    QVariant itemChange(GraphicsItemChange change,
                        const QVariant &value);
};
In the constructor we make the item selectable, movable and most importantly - with ItemSendsGeometryChanges enabled.
CustomRectItem::CustomRectItem(const QRect& rect, QGraphicsItem* parent,
                               QGraphicsScene* scene):
    QGraphicsRectItem(rect, parent, scene)
{
    setFlags(QGraphicsItem::ItemIsSelectable |
            QGraphicsItem::ItemIsMovable |
            QGraphicsItem::ItemSendsGeometryChanges);
}
Next, we override itemChange() for the case ItemPositionChange. Instead of returning the original position we return the closest grid point, e.g. for an item's position (68,92) and grid size 20 we return the closest grid point (60,100). The formula below does just that:
xV = round(68/20)*20 = round(3.4)*20 = 3*20 = 60
yV = round(92/20)*20 = round(4.6)*20 = 5*20 = 100
QVariant CustomRectItem::itemChange(GraphicsItemChange change,
const QVariant &value)
{
    if (change == ItemPositionChange && scene()) {
        QPointF newPos = value.toPointF();
        if(QApplication::mouseButtons() == Qt::LeftButton &&
                qobject_cast<Scene*> (scene())){
            Scene* customScene = qobject_cast<Scene*> (scene());
            int gridSize = customScene->getGridSize();
            qreal xV = round(newPos.x()/gridSize)*gridSize;
            qreal yV = round(newPos.y()/gridSize)*gridSize;
            return QPointF(xV, yV);
        }
        else
            return newPos;
    }
    else
        return QGraphicsItem::itemChange(change, value);
}
Notice that I check whether the left mouse button was pressed. If I do not perform this check, the position gets adjusted whenever I programmatically call setPos() (e.g. at the start) which is not what I want for this specific example.
That's it. This is all we need to do for the Variant 1 of the problem.
Variant 2 - Moving QGraphicsItem by a grid step
Unlike the previous implementation, this implementation enables us to move an item by a specific grid step, i.e. items that were previously non-aligned will remain non-aligned by the same offset, aligned items will remain aligned. This feature requires that we store the original offset between the item and the grid, specifically, the offset between the item and the closest top-left grid point. Practically this means overriding item's mousePressEvent().
class CustomRectItem : public QGraphicsRectItem
{
public:
    CustomRectItem(const QRect& rect, QGraphicsItem* parent,
                                   QGraphicsScene* scene);
protected:
    void mousePressEvent(QGraphicsSceneMouseEvent *event);
    QVariant itemChange(GraphicsItemChange change,
    const QVariant &value);
private:
    QPointF offset;
    QPointF computeTopLeftGridPoint(const QPointF &pointP);
};
In mousePressEvent() we store the original offset between the item and the closest top-left grid point.
void CustomRectItem::mousePressEvent(QGraphicsSceneMouseEvent *event){
    offset = pos() - computeTopLeftGridPoint(pos());
    QGraphicsRectItem::mousePressEvent(event);
}
The helper function computeTopLeftGridPoint(QPointF) gives us not just any closest grid point, but the the closest top-left grid point. Like this, the item will always refer to the same point. The function uses flooring (unlike in Variant 1 where we used rounding). e.g. for a grid size 20 and item's position (68,92) the top-left grid point is (60,80). This is exactly what the formula below does:
xV = floor(68/20)*20 = floor(3.4)*20 = 3*20 = 60
yV = floor(92/20)*20 = floor(4.6)*20 = 4*20 = 80
QPointF CustomRectItem::computeTopLeftGridPoint(const QPointF& pointP){
    Scene* customScene = qobject_cast<Scene*> (scene());
    int gridSize = customScene->getGridSize();
    qreal xV = floor(pointP.x()/gridSize)*gridSize;
    qreal yV = floor(pointP.y()/gridSize)*gridSize;
    return QPointF(xV, yV);
}
Below you can see the itemChange() method. Notice that unlike in Variant 1 we return the closest top-left grid point + the original offset.
QVariant CustomRectItem::itemChange(GraphicsItemChange change,
const QVariant &value)
{
    if (change == ItemPositionChange && scene()) {
        QPointF newPos = value.toPointF();
        if(QApplication::mouseButtons() == Qt::LeftButton &&
            qobject_cast<Scene*> (scene())){
                QPointF closestPoint = computeTopLeftGridPoint(newPos);
                return  closestPoint+=offset;
            }
        else
            return newPos;
    }
    else
        return QGraphicsItem::itemChange(change, value);
}
That's it! Now try dragging the items (one by one) on the grid for both variants of the problem.
Tagged: Qt